The name comes from the Sanskrit words Shava (शव, Śava) meaning "corpse", and Asana (आसन, Āsana) meaning "posture" or "seat". This is an Asana for relaxation of all muscles, nerves, etc. This Asana should be performed at the very end. It is a closing pose. Mritasana is another name for this pose.
Procedure
Lie on your back.
Take a breath in and tense your whole body from head to toes. Hold your breath, clench your fists, and squeeze all facial muscles as well as every single muscle in the body.
Breathing out through the mouth with a “haaa” sound, release your muscles.
Repeat once more.
Now lie comfortably. Keep your eyes closed.
Relax all parts of your body.
Take your awareness to all parts of the body in turn, starting at the feet and ending with the head, feeling grateful for each part of the body. Gratefulness adds to the physical and mental relaxation.
Let mother earth take all your weight. Feel the body to be very light. A relaxed body feels light.
Next, allow your breath to relax by becoming aware of it and making it soft, small, and quiet.
Now allow your mind to relax by letting go of any worries, fears, anxiety, or excitement. Surrender them all. For the time being, let go of any future plans or past events.
Rest in the peaceful and blissful space within you.
After resting for a few minutes, bring your awareness back to your body and take a few deep breaths.
Gently roll over onto your right side.
Slowly come up to the sitting position.
Chant Om three times.
Gently, taking your own time, open your eyes.
Benefits
Relaxes your psycho-physiological system.
Develops awareness of the body .
It is Savasana that promptly and efficiently ensures complete relaxation and perfect ease.
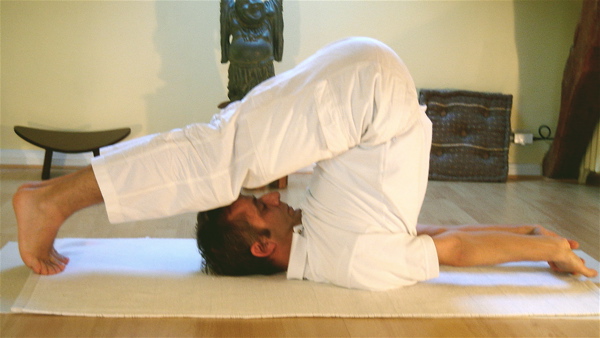
The name comes from the Sanskrit words hala (हला) meaning "plow" and asana (आसन) meaning "posture" or "seat" .When this pose is practised, it gives the exact appearance of a plough. Hala means a plough in Sanskrit.
Caution: If you have had abnormal blood pressure, glaucoma, detached retina, chronic thyroid disorders, neck or shoulder injuries, consult your teacher and physician before doing the shoulder stand
Procedure
Go into the shoulder stand. Keep the back supported with your hands.
Breathe in. Keeping the left leg straight up, exhale and lower the right leg to the floor behind the head.
Breathing in, lift the right leg straight up.
Breathing out, lower the left leg to the floor. Keep the right leg up.
Breathing in, lift the left leg up.
Breathing out, lower both the legs to the floor. Keep the spine erect. If the feet do not reach the floor, don’t struggle to bring them down. Instead press them toward the wall behind you. Straighten the knees.
If your toes reach the floor, move them in toward the head and straighten your spine. Press the knees up. Do not press the neck into the floor.
If you don’t need to support your back with the hands, lower your arms to the floor, palms facing down. Breathe deeply and stay in the posture for 20-60 seconds.
To come out of the posture, support the back with your hands. Lift the legs up and lower the spine to the floor, vertebra by vertebra, without lifting the head
Benefits
This Asana tones the spinal nerves, the muscles of the back, the vertebral bones and the sympathetic nervous system that runs along the vertebral column on both sides. This Asana fulfils and amplifies Sarvangasana.
A large quantity of blood is poured into the spinal roots of nerves, spinal cord, sympathetic ganglia, sympathetic nerves and muscles of the back. Hence, they are all well nourished.
The vertebral column is rendered very, very soft and elastic.
This Asana prevents the early ossification of the vertebral bones. Ossification is quick degeneration of bones. Old age manifests quickly on account of early ossification. The bones become hard and brittle in the degenerative process. He who practises Halasana is very nimble, agile, full of energy.
The muscles of the back are alternatively contracted, relaxed and then pulled and stretched. Hence they draw a good supply of blood by these various movements and are well nourished.
Various sorts of myalgia (muscular rheumatism), lumbago, sprain and neuralgia are cured by this Asana.
The vertebral column becomes soft and elastic. It is twisted and rolled as it were like a piece of canvas sheet. A man who practises Halasana can never become lazy.
The vertebral column is a very important structure. It supports the whole body. It contains the spinal cord, spinal nerve and sympathetic system. In Hatha Yoga the spine is termed as Meru Danda. Therefore you must keep it healthy, strong and elastic by the practice of Halasana. The muscles of the abdomen, the rectal muscles and the muscels of the thigh are also toned and nourished.
Obesity or corpulence and habitual or chronic constipation, gulma, congestion and enlargement of the liver and spleen are cured by this Asana.
Surya Namaskara (IPA: [su:rjɐ nɐmɐskɐ:rɐ]; Sanskrit: सूर्य नमस्कार; IAST: Sūrya Namaskāra), known in English as Sun Salutation (lit. "salute to the sun"), is a common sequence of Hatha yoga asanas. Its origins lie in a worship of Surya, the Hindu solar deity. This sequence of movements and poses can be practised on varying levels of awareness, ranging from that of physical exercise in various styles, to a complete sadhana which incorporates asana, pranayama, mantra and chakra meditation. It is often the beginning vinyasa within a longer yoga series. Sūrya Namaskāra may also refer to other styles of "Salutations to the Sun".
Sun Salutation is said to be the complete body workout. Yoga experts say that doing 12 sets of Sun Salutation translates into doing 288 powerful yoga poses in a span of 12 to 15 minutes! Sun Salutation is another example of how good things come in small (read quick) packages.
Procedure
Step #1: Pranamasana (Prayer pose)
Stand at the edge of your mat, keep your feet together and balance your weight equally on both the feet.
Expand your chest and relax your shoulders.
As you breathe in, lift both arms up from the sides and as you exhale, bring your palms together in front of the chest in prayer position.
Step #2: Hastauttanasana (Raised arms pose)
Breathing in, lift the arms up and back, keeping the biceps close to the ears. In this pose, the effort is to stretch the whole body up from the heels to the tips of the fingers
How to deepen this yoga stretch?
You may push the pelvis forward a little bit. Ensure you're reaching up with the fingers rather than trying to bend backwards.
Step #3: Hasta Padasana (Hand to foot pose)
Breathing out, bend forward from the waist, keeping the spine erect. As you exhale completely, bring the hands down to the floor, beside the feet.
How to deepen this yoga stretch?
You may bend the knees, if necessary, to bring the palms down to the floor. Now make a gentle effort to straighten the knees.
It's a good idea to keep the hands fixed in this position and not move them henceforth until we finish the sequence.
Step #4: Ashwa Sanchalanasana (Equestrian pose)
Breathing in, push your right leg back, as far back as possible. Bring the right knee to the floor and look up.
How to deepen this yoga stretch?
Ensure that the left foot is exactly in between the palms.
Step #5: Dandasana (Stick pose)
As you breathe in, take the left leg back and bring the whole body in a straight line.
How to deepen this yoga stretch?
Keep your arms perpendicular to the floor.
Step #6: Ashtanga Namaskara (Salute with eight parts or points)
Gently bring your knees down to the floor and exhale. Take the hips back slightly, slide forward, rest your chest and chin on the floor. Raise your posterior a little bit.
The two hands, two feet, two knees, chest and chin (eight parts of the body touch the floor).
Step #7: Bhujangasana (Cobra pose)
Slide forward and raise the chest up into the Cobra posture.You may keep your elbows bent in this pose, the shoulders away from the ears. Look up.
How to deepen this yoga stretch?
As you inhale, make a gentle effort to push the chest forward; as you exhale, make a gentle effort to push the navel down. Tuck the toes under. Ensure you're stretching just as much as you can; do not force.
Step #8: Parvatasana (Mountain pose)
Breathing out, lift the hips and the tail bone up, chest downwards in an 'inverted V' (/\) posture.
How to deepen this yoga stretch?
If possible, try and keep the heels on the ground and make a gentle effort to lift the tailbone up, going deeper into the stretch.
Step #9: Ashwa Sanchalanasana (Equestrian pose)
Breathing in, bring the right foot forward in between the two hands, left knee down to the floor, press the hips down and look up.
How to deepen this yoga stretch?
Place the right foot exactly between the two hands and the right calf perpendicular to the floor. In this position, make a gentle effort to push the hips down towards the floor, to deepen the stretch.
Step #10: Hasta Padasana (Hand to foot pose)
Breathing out, bring the left foot forward. Keep the palms on the floor. You may bend the knees, if necessary.
How to deepen this yoga stretch?
Gently straighten the knees and if you can, try and touch your nose to the knees. Keep breathing .
Step #11: Hastauttanasana (Raised arms pose)
Breathing in, roll the spine up, hands go up and bend backwards a little bit, pushing the hips slightly outward.
How to deepen this yoga stretch?
Ensure that your biceps are beside your ears. The idea is to stretch up more rather than stretching backwards.
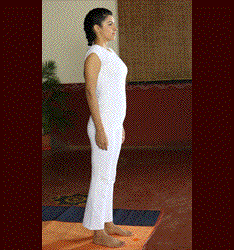
Step #12: Tadasana
As you exhale, first straighten the body, then bring the arms down. Relax in this position, observe the sensations in your body.
Surya Namaskar Mantras
Sun Salutation Pose
Sun Salutation Mantra
Meaning
Pranamasana (Prayer pose)
Om Mitraaya Namaha
Who is friendly to all
Hastauttanasana (Raised arms pose)
Om Ravaye Namaha
The shining one, the radiant one
Hasta Padasana (Hand to foot pose)
Om Suryaya Namaha
Who is the dispeller of darkness and responsible for bringing activity
Ashwa Sanchalanasana (Equestrian pose)
Om Bhaanave Namaha
One who illumines, the bright one
Dandasana (Stick pose)
Om Khagaya Namaha
Who is all-pervading, one who moves through the sky
Ashtanga Namaskara (Salute with eight parts or points)
Om Pooshne Namaha
Giver of nourishment and fulfillment
Bhujangasana (Cobra pose)
Om Hiranyagarbhaaya Namaha
Who has golden color brilliance
Parvatasana (Mountain pose)
Om Mareechaye Namaha
The giver of light with infinite number of rays
Ashwa Sanchalanasana (Equestrian pose)
Om Aadityaaya Namaha
The son of Aditi – the cosmic divine Mother
Hasta Padasana (Hand to foot pose)
Om Savitre Namaha
One who is responsible for life
Hastauttanasana (Raised arms pose)
Om Aarkaaya Namaha
Worthy of praise and glory
Tadasana
Om Bhaaskaraya Namaha
Giver of wisdom and cosmic illumination
It is a good idea to chant the sun salutation mantras with the proper intonations. You could learn the correct mantra chanting along with the video. The only rule to remember is to chant them with gratefulness. Each sun salutation mantra has a specific meaning, but it is not important to delve into what each mantra means.
Benefits
These powerful yoga poses have a great impact on the heart, liver, intestine, stomach, chest, throat, and legs – the whole body from top to bottom.
It purifies the blood and improves blood circulation throughout the body, and ensures proper functioning of the stomach, bowels, and nerve centers.
Practicing Sun Salutation daily helps balance the three constitutions - Vata, Pitta and Kapha - that the body is made up of.
Moreover, it gives mild exercises to leg and arm muscles and ensures good circulation of blood. At the same time, the sun's life-giving rays play on the man's body, sucking away the toxins along with perspiration invigorating circulation and imparting life to the human organism-the life which the sun alone can give .
For a person with stiff limbs and spine the Suryanamaskara exercise is a boon to bring back lost flexibility.
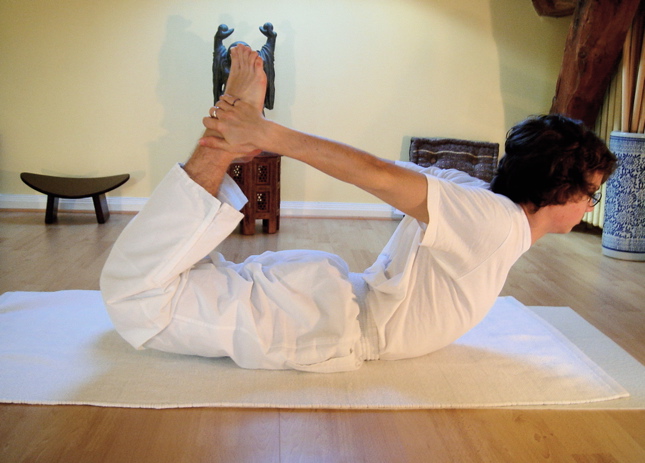
The name comes from the Sanskrit words Chakra (चक्र, Cakra) meaning "wheel", and Asana (आसन, Āsana) meaning "posture" or "seat".Many acrobats demonstrate this Asana in the streets. Young boys can do this Asana very easily because their spine is very elastic. When the bones become rigid and ossified in advanced years, bending of the spine becomes difficult. It resembles a circle. Hence the significant name Chakrasana. In fact, it resembles more a bow than a circle.
Procedure
Lie on your back; feet together and hands relaxed by the sides. Take deep breaths in and out.
Bend your legs and place the feet on the floor, close to the hips, wider than the hips.
Stretch the arms away from the body in line with the shoulders, with the palms facing up.
Gently bring both knees to the ground on your right side, keeping the feet close to the hips.
Turn the head to your left to look at your left palm, keeping both shoulders on the ground.
Press the knees and thighs to the floor without lifting the shoulders. Hold.
Gently come back to the centre by bringing the legs up.
Repeat on the other side.
Benefits
He who practises this Asana will have perfect control of the body.
He will be agile and nimble. He can turn out more work in a short space of time. All the parts of the body are benefited by this Asana.
When you raise yourself upon this Asana the body will be light. You will get exhilaration of spirit at once.
You will be ready for active work. If there is any pain in the neck and shoulders after the practice of Sarvangasana, do this Asana immediately for a few minutes.
It will relieve the pain as it bends the neck backwards and thus it is a counter-pose to Sarvangasana.
All the other benefits of Dhanurasana, Salabhasana and Bhujangasana are derived from this Asana.
When this Asana is performed, it represents the appearance of a bow (Dhanus). The stretched arms and forelegs form the string of the bow. It bends the spine backwards. It supplements Bhujangasana. We can say it is a combination of Bhujangasana and Salabhasana with the addition of catching the ankles with the hands. Bhujangasana, Salabhasana and Dhanurasana form a valuable combination. They always go together. They form one set of Asanas. This combination acts as a counter-pose to Halasana and Paschimottanasana, which bend the spine forwards.
Procedure
Lie on your abdomen, feet together, forehead on the floor.
Bend your legs toward the hips and hold the feet at the ankles with your hands.
Breathing in, raise the head, chest and knees up.
Focus on widening the shoulders, bringing the knees together and lifting them higher.
Straighten the elbows by pushing the hands away with the feet and lift the chin up.
Hold and continue breathing in and out.
Breathing out, gently come down and press feet down onto hips, press the thighs into the floorto stretch the quadriceps.Release and relax.
Benefits
This is useful in chronic constipation, dyspepsia and sluggishness of liver.
It removes hunchback, rheumatism of legs, knee-joints and hands.
It reduces the fat, energises digestion, increases peristalsis, invigorates the appetite and relieves congestion of blood in the abdominal viscera and tones them also.
Dhanurasana is a blessing for people who suffer from gastro-intestinal diseases.
It keeps the spine elastic. It prevents premature ossification of bones.
He who does Halasana, Mayurasana and Dhanurasana can never become lazy. He is full of energy, vigour and vitality.
The name comes from the Sanskrit words paschima (पश्चिम, paścima) meaning "west" or "back" or "back of body",and uttana (उत्तान, uttāna) meaning "intense stretch" or "straight" or "extended", and asana (आसन) meaning "posture" or "seat" .
Procedure
Sit on the ground and stretch the legs stiff like a stick.
Catch the toes with the thumb, index and middle fingers. While catching, you will have to bend the trunk forwards. Fatty persons will find it rather difficult to bend.
Exhale and slowly bend without jerks till your forehead touches your knees. You can keep the face between the knees also.
When you bend down draw the belly back. This facilitates the bending forwards. Bend slowly by gradual degrees. Take your own time. There is no hurry.
When you bend down, bend the head between the hands. Retain it on a level with them.
Young persons with elastic spine can touch the knees with the forehead even in their very first attempt. In the case of grown-up persons with rigid spinal column, it will take a fortnight or a month for complete success in the posture.
Retain the breath till you take the forehead back to its original position, till you sit straight again. Then breathe.
Duration
Retain the pose for 5 seconds. Then gradually increase the period to 10 minutes.
Benefits
This is an excellent Asana. It makes the breath flow through the Brahma Nadi, Sushumna, and rouses the gastric fire.
It reduces fat in the abdomen. This Asana is a specific for corpulence or obesity and for the enlargement of spleen and liver .
It reduces fat in the abdomen. This Asana is a specific for corpulence or obesity and for the enlargement of spleen and liver .
It increases the peristalsis of the bowels. Peristalsis is the vermicular movement of the bowels or intestines by which food and faecal matter are pushed from one portion of the bowels to another.
This Asana relieves constipation, removes sluggishness of liver, dyspepsia, belching and gastritis. Lumbago or stiff back and all sorts of myalgia and other diseases of the back muscles are cured.
This Asana cures piles and diabetes also. The hip muscles of the abdomen, the solar plexus of nerves, the epigastric plexus of nerves, bladder prostrate, lumbar nerves, sympathetic cord, are all toned up and kept in a healthy, sound condition .
The name comes from the Sanskrit words baddha (बद्ध, baddha) meaning "bound", kona (कोण, koṇa) meaning "angle" or "split", and Asana (आसन, Āsana) meaning "posture" or "seat
Procedure
Sit up straight with legs straight.
Bend your knees and bring the soles of your feet together.
Grab your feet by placing your hands underneath them.
Bring the heels as close as possible to the genitals.
Sit with the spine erect.
Take a deep breath in. On exhalation, press the thighs and knees downward towards the floor. Keep them pressing downward.
Now, relax the breath and like the wings of a butterfly, flap both knees up and down, start slow then increase the speed slightly. Keep breathing freely.
Slow down then stop, take a deep breath in and on exhalation, bend forward keeping the chin up and spine straight.
Press your elbows on the thighs or the knees to push knees and thighs closer to the floor.
Feel the stretch in the inner thighs and breath in and out, relaxing the muscles more.
Take a deep breath in and bring the torso up.
Exhale. Release the posture. Straighten the legs.
Benefits
It is a strong groin- and hip-opener and one of the few asanas that can be practiced comfortably soon after eating as long as the head is not rested on the floor .
The pose is specially recommended for those suffering from urinary disorders. The pelvis, the abdomen and the back are stimulated by a plentiful blood supply.
It relieves sciatic pain and prevents hernia. If practised regularly, it relieves pain and heaviness in the testicles. For women, coupled with Sarvangasana, it checks irregular menses and helps the ovaries to function properly .
Regular practise of this posture may be beneficial for the lumbar region, flat feet, high blood pressure, infertility and asthma .
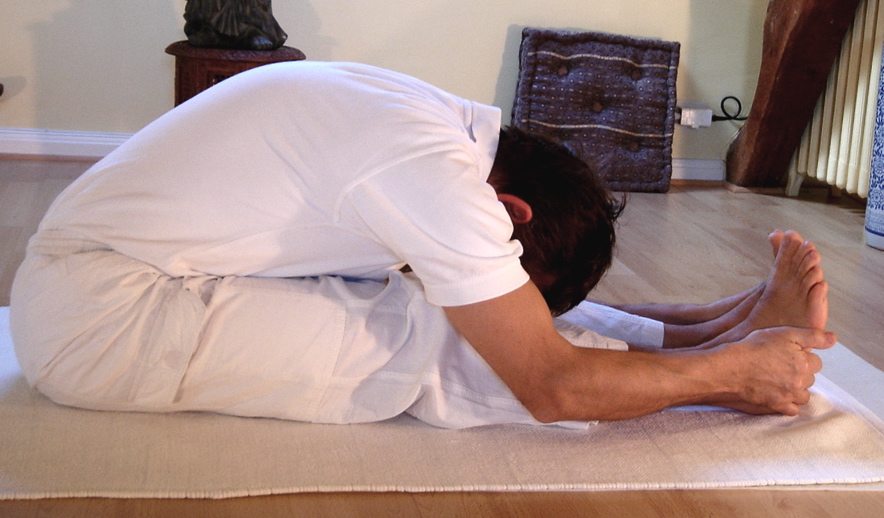
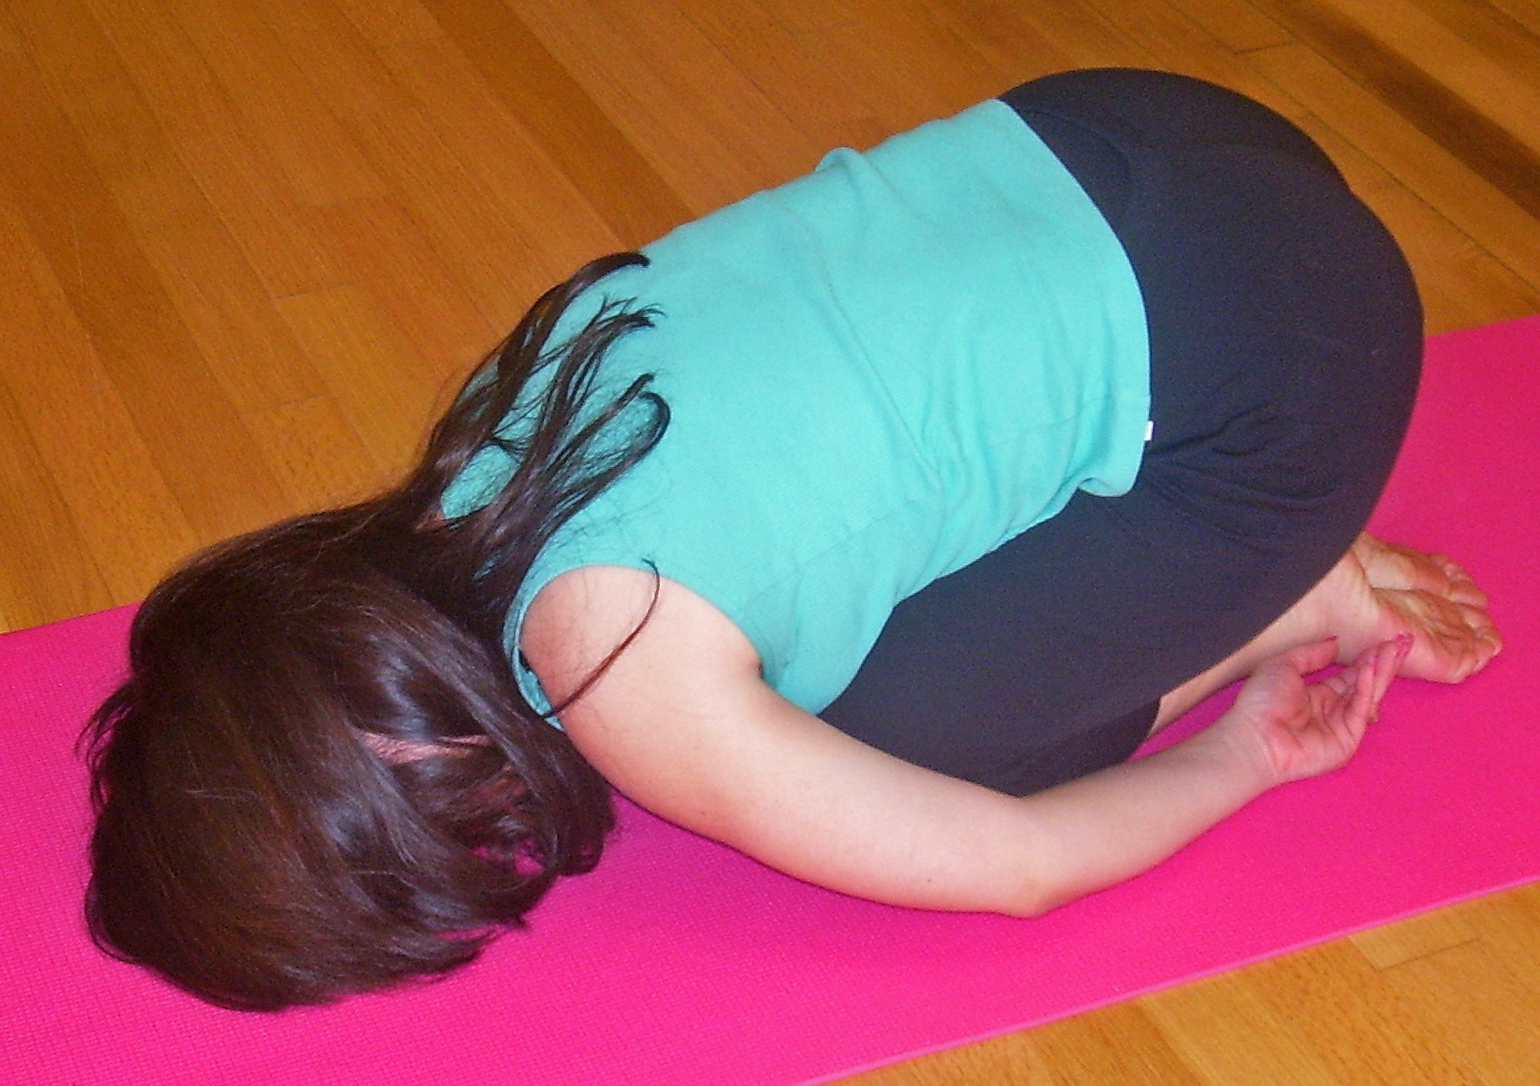
This asana is also known as balasana The name comes from the Sanskrit words bala meaning "child" and asana (आसन) meaning "posture" or "seat" .
Procedure
Sit in Padmasana or sit on your heels. Keeping your hips on the heels, bend forward, and lower your forehead to the floor.
Keep the arms alongside your body with hands on the floor, palms facing up. (If this is not comfortable, you can place one fist on top of another and rest your forehead on them.
Gently press your chest on the thighs.
Hold.
Slowly come up to sit on the heels, uncurling vertebra by vertebra and relax.
Benefits
This pose gently streches the hips thighs and ankles .
This also relieves back and neck pain when done with head and torso supported .
This pose calms the brain and relieves the tension and stress to such a great extent and it is even said that if someone is going for suicide and you make him perform this pose then he will change his idea of suicide because of the stress busting quality of this pose
Sit up with the legs stretched out straight in front of you, keeping the spine erect.
Bend the left knee and place the left foot against the right thigh, keeping the left knee on the floor.
Breathing in, raise both arms above your head and stretch up, and twist a little to the right from the waist.
Breathing out, bend forward from the hip joints keeping the spine straight, directing your chin to the toes.
If you can, hold on to your big toes and, pointing your elbows to the ground, move forward as you pull on your toes.
Hold. Keep breathing.
Breathing in, come up and breathing out, bring the arms down to the sides.
Repeat on the other side.
Benefits
Stretches the spine, shoulders, hamstrings, and groins
Massages the abdominal organs and tones the shoulders
Therapeutic for high blood pressure, insomnia, and sinusitis
Calming to the brain and helps relieve mild depression.
If one is not able to do paschimottan asana then he is made to practise this asana which made the muscles flexible to move into paschimottan asana after few days .
In Sanskrit language word “Simha” stands for Lion and also the seated pose of this asana is resembles to majestic and seated pose king of forest, “Lion” that is why it is also renowned as “Singhasana” or “Lion Pose”. This unique asana is established and practiced by the yogis since ancient times. Here we showcase steps for how to do Simhasana and straightforward techniques for gaining its encouraging benefits. According to old tradition, this asana helps to removes each & every ailments and offers three chief Bandhas known as Mula, Jalandhara & Uddiyana.
Procedure
First of all kneel down on the floor and place the knees apart about the width of shoulders.
Then sit back on the heels such that calves are placed flat on the ground.
Now try to spread knees little bit further as much as it feels comfort .
Now straighten and lengthen up the back and shoulder muscles and sit straight.
Place both hands loosely over the knees and avoid rounding of shoulders.
Now inhale and tilt the body slightly forward by keeping the spine straight and placing the hands on the ground.
Then stretch the mouth and try to bring tongue out as much as possible.
Retain this posture for one complete breathe and after relaxing for some time tilt back and allow the fingers to drop back to the knees and provide relaxation to mouth and tongue by closing them.
Repeat the same process for 3-4 times by dividing them in various sessions.
Duration
As there is no specific time duration for practicing Lion pose so it is suggested that one should practice asana as long as one feels it comfort and ease but don’t try to overdo it.
Benefits
Simhasana benefits to alleviate tension from the chest and face.
It assists to keep platysma firm with increase in age.
It also helps to make thyroid gland active.
Simhasana steps helps to keep away major ailments and offers three major Bandhas known as Mula, Jalandhara and Uddiyana.
Simhasana benefits to exercise neck muscles and for advancing blood circulation in the body.
Those who sit in this Asana have a steady, firm pose. They cannot be easily shaken. The knees are rendered very hard. The Meru Danda becomes firm and strong .
Procedure
Keep the soles of the feet on both sides of the anus i.e., place the thighs on the legs one over the other and the soles on the buttocks.The calves must touch the thighs.
The part from the toe to the knee should touch the ground. The whole burden of the body is put on the knees and ankles.
In the beginning of practice, you may feel a slight pain in the knee and ankle joints but it passes off very quickly. Massage the paining parts and the two joints with the hands.
After the feet and the knees, put both the hands straight on the knees. Keep the knees quite close.
Sit like this, keeping the trunk, neck and head in one straight line.
Benefits
If you sit in this Asana for about half an hour immediately after food, the food will be digested well. Dyspeptics will derive much benefit.
The nerves and muscles of the legs and thighs are strengthened. Myalgia in the knees, legs, toes and thighs disappears.
Sciatica vanishes. Flatulence is removed. The stomach works vigorously.
The practice of Vajrasana exercises a stimulating, beneficial influence on Kanda, the most vital part, and which is situated 12 inches above the anus and from which 72,000 Nadis spring.
Ardha means half. This is half a pose. This Asana takes its name from the Rishi or Yogi Matsyendra, who first taught this Asana to the students of Hatha Yoga. This Matsyendra is said to have been the disciple of Lord Siva. Once Siva departed for a lonely island. There He taught Parvati the mysteries of Yoga. A fish that happened to be near the shore heard the teachings of Lord Siva. Siva came to know this. His heart being filled with mercy He sprinkled water on this Yogi-fish. Immediately, on account of Siva's grace, the fish became a Siddha Yogi with a divine body. This Yogi fish was called by the name Matsyendra .
Procedure
Place the left heel near the anus and below the scrotum. It can touch the perennial space. Do not allow the heel to move from this place. Perennium is the space between the anus and the external organ of generation.
Bend the right knee and place the right ankle at the root of the left thigh and rest the right foot well on the ground, close to the left hip joint.
Place the left Axilla arm-pit over the top of the vertically bent right knee. Push the knee now a little to the back so that it touches the back part of the Axilla
Catch hold of the left knee with the left palm.
Then applying pressure at the left shoulder-joint, slowly twist the spine and turn to the extreme right.
Turn the face also to the right as much as you can do. Bring it in a line with the right shoulder. Swing round the right arm behind the back. Catch hold of the left thigh with the right hand.
Retain the pose from 5 to 15 seconds. Keep the vertebral column erect. Do not bend.
Similarly, you can twist the spine to the left side. This will complete the spinal twist.
Benefits
This Asana increases appetite by increasing the digestive fire. It destroys terrible diseases.
It rouses Kundalini and makes the Chandranadi (moon) flow steadily.
The moon is said to be located above the root of the palate. It drops the cool ambrosial nectar, which is wasted by mixing with gastric fire. But this Asana prevents it.
It keeps the spine elastic and gives a good massage to the abdominal organs.
Lumbago and all sorts of muscular rheumatism of the back muscles are cured. The spinal nerve-roots and sympathetic system are toned.They draw a good supply of blood.
When this Asana is demonstrated, it will look like the face of a cow. Hence this significant name. Gomukha means `Cow-face.'
Procedure
Place the heel of the left leg under the left part of the anus.
Bring the right leg in such a way that the right knee will be above the left knee and the right sole along the side of the left thigh in close contact. By gradual practice, you will have to bring the right heel to touch the left buttock. Sit quite erect.
Now take the left hand to the back, raise the left index-finger upwards. Bring the right index-finger downwards and catch hold of the left index-finger firmly. Make a finger-lock now.
If it slips, try again, and keep the lock for two minutes. Breathe slowly.
When you make the finger-lock, do not turn the body, do not bend the heel and chest. Keep the trunk quite straight. Change the hands and legs alternately .
Benefits
This Asana removes rheumatism in the legs, sciatica, piles or haemorrhoids, neuralgia of the legs and thighs, indigestion, dyspepsia, muscular pain in the back, and sprain in the forearms.
This helps in maintaining Brahmacharya and good health. Mula Bandha comes by itself and can be kept up with ease. Hence, this Asana is suitable for the practice of Pranayama.
Ordinarily you can sit at all times in this Asana for long meditation also. Lean persons with thin thighs and legs will like this Asana very much